Development of iArabicWeb16 Search Engine (2) – Indexing

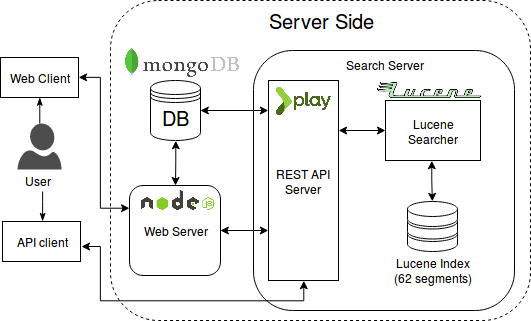
This is the second installment of a series of posts I’m writing about how we developed iArabicWeb16 search engine. In the previous post, we talked about the overall architecture, and went through some design decisions. In this post, we’ll focus on how we indexed the 150M documents.

Documents Format and Processing

Before jumping into the process of indexing, we need first to understand how the crawled data was represented. It was a collection of WARC files (know more about them here). Now from the WARC files we needed to extract few things: the title, the URL, the type of the document, and the content. Luckily, the collection was split into multiple WARC files which made it easier to parallelize and/or distribute the indexing step.

Indexing Process

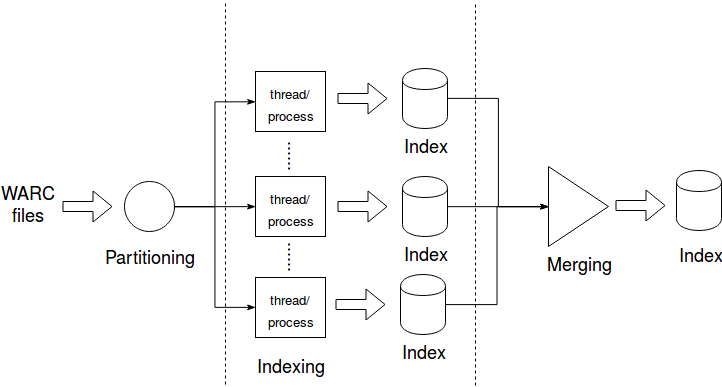
Indexing documents in Lucene is as easy as it gets, so we won’t talk about it. Instead, we’ll talk about the process itself. The indexing process was three-fold: partitioning, indexing, and merging. The following figure shows those steps.

indexing

  1. Partitioning

    Since we had a lot of documents, indexing them in one shot would take a very long time. Instead, we partitioned the dataset into nearly identical partitions and gave each one to an indexer. Now we have two options: multiple threads on the same machine, or multiple processes across different machines. In the early days we had only one machine, but after we acquired three decent machines for the research group we distributed the process. This was done over a year ago and I don’t have the exact numbers, but indexing across multiple machines was MUCH faster, as one would expect.

  2. Indexing

    Now that we are done with partitioning the data, we can go on and build our individual indexes. The indexer itself has knowledge of neither the partitioner nor the merger; it operates independently.

    You might have noticed in the figure that we said “thread/process”, this conveys two ways of operating. The first is using threads, and it is made for the cases where everything is small enough to fit into a single machine. This was the case in the beginning where we had fewer files for experimentation. After we were done with the tests and experiments on the data, we had to index everything, and that’s when the second mode of operation came into play. Luckily for us, the machines had access to a shared Network File System, so we didn’t have to transfer some of the files over from one machine to another.

    If you have done some work with Lucene you might be wondering why I didn’t mention the number of segments or the merging policy. That’s because at this stage, we don’t know how many segments we need. We will discuss this in the merging step.

  3. Merging

    So far so good, we have N indexes ready to be searched. Not so fast. Our requirements state that there will only be one searcher. Not distributed search engine; the machines we had access to are not only for this project after all.

    Now we have another problem, how many segments should the final index contain? Let me tell you why this is a problem. You can search multiple segments in parallel, but you cannot search a single segment in parallel, unless you are very careful and I am not sure if Lucene’s index structure will even allow it. Basically, too few segments and a single query will be slow, too many and you will have either 1) too many threads being slow because of context switching among them, 2) limited number of threads searching a large number of segments which will make it also slow. There is no way to find that sweet spot between the two extremes without experimentation.

That was pretty much all for this part. Unfortunately, our experiments and tests on indexing were not recorded, but expect some charts in the next one where we talk about searching.


Development of iArabicWeb16 Search Engine (1) – Introduction

Two years ago, I started working on building a search engine for a web collection for Arabic web pages and tweets called ArabicWeb16. The collection contained around 150M web documents, and a lot of tweets (I don’t really remember the number). The project was quite challenging, especially for an undergraduate who hasn’t worked with such amount of data before and had to work on everything on his own. In this post, and the ones to come, I’ll go into the development process of the search engine and some of the decisions I made along the way.

Note: Some of the information mentioned here are discussed in a paper which was accepted into OSACT 2018.

The Requirements of the System

The requirements were very straightforward, here they’re:

  1. It should be able to index WARC files
  2. Indexing should be configurable and should have an option for parallel indexing
  3. The searcher should have an API for external use
  4. The searcher should allow retrieval of cached documents (i.e. the documents shouldn’t just be indexed, they have to be stored somewhere)

Tools, Languages, and Frameworks

Just like any other projects, some decisions regarding what will be used for the development process had to be made upfront. Here we’re going to go over some of the decisions related to that.

Java and Lucene

Although other options exist (such as Indri or Terrier), the obvious choice for any custom search engine is definitely Lucene with Java (or any other JVM language really). I could have used something like Solr as well to make my life easier, but I went with vanilla Lucene for the experience.

MongoDB

We need to store raw documents, sure we can store the content of documents in the index but there are multiple reasons why you probably shouldn’t do that, those reasons will be discussed in the posts to come. In the end, I settled for MongoDB, it’s convenient, fast, and fits the problem perfectly. If we wanted to store relations between documents as in constructing a web graph, the better option would have been Neo4j but we had no need for that.

Play Framework

Since we wanted to provide a search API, I needed a web framework to build a REST API, and for that I chose Play. Play comes packed with features that make developing web back-end an easy experience. It also supports concurrency, and is highly configurable.

NodeJS

Why do we need two web servers? Simple, one for the web interface and one for the search API. Why not mix the two together? check the next section for an answer. Why NodeJS? it’s easy, lightweight, and super fast to build a web back-end with. Of course you can easily write a messy server code with it since it’s JavaScript, but I shamefully did in some parts. I had to refactor many parts of the code later after I was more experienced with JavaScript.

Search Architecture

In this section we’ll discuss the architecture of the system without indexing; details on the indexing phase will be discussed in the next post.

We mentioned some technologies in the previous sections but we didn’t mention how they all fit together. This figure will show how the all interact with one another.

arch

As you can see, a user can either search using the web interface, or using the REST API (of course a key needs to be acquired before having access to the REST API server).

So why do we have two web servers? If the world of software engineering has taught us one thing it’s got to be that coupling is bad, and in our case, here’s precisely why:

  1. What happens if we wanted to deploy each one on a different machine? We can’t
  2. What happens if we wanted to modify one of them? We have to shut down everything and redeploy
  3. The most important point, what happens if we wanted to distribute the index and have multiple search servers, one for each? Again we can’t do that if we’ll put everything into one piece
  4. The web server takes care of rendering web pages but it also manages users, sessions, and provides access to a topic collection tool (only visible to certain users). None of that has anything to do with searching the collection. It only makes sense that we have a separate server which takes care of those things


That’s all for this part, in the next post we’ll talk more about indexing the collection.

Automating Manual Deployment

Who doesn’t love automating tasks, especially the tedious deployment tasks? And yes there are tons of tools to help you make your life easier, after all who needs manual deployment in the age of Continuous Delivery? Well, it all depends on your project and whether you actually need to waste time setting up some fancy tools to help you; use the right tool for the right job.  Sometimes it’s just easier to deploy using the good old SSHy way, which is is what I chose for one of the projects I was working on. Of course I wrote scripts to handle deploying each part of the application, but I came to realize that those scripts could be abstracted into a tool in order to minimize the work in the future (and avoid mistakes).

In this tutorial we will have a look at Husky (find it on Github here) and use it to automate deploying a simple NodeJS application. Follow the installation instructions on the Github project to properly install it.


Before we start, Husky relies on SSH so do yourself a favor and generate an access key to the server, unless you love your password so much that you want to keep typing it.

Husky Operations

The pipeline of operations is fairly simple

huskypl

First we build (and package the files we wish to deploy), we transfer them to the remote server, and then we run the project there. In the next section we’ll see how to take care of those tasks using Husky.

Example

In this section we go through a simple scenario of deploying a toy NodeJS project to a remote server and running it.

1. Create your project

Needless to say, you need to create your project beforehand. We’re not going to go through the process of creating a new NodeJS project, there is plenty of resources about that.

2. Initialize Husky files

Make sure that you’re in the directory of the project you want to configure its deployment then run

husky init

You’ll be promoted to enter the following:

  • IP or host name of the remote server
  • The username by which you’ll login into the remote server
  • The build directory from which we’ll grab the deployable files
  • The remote directory to which we’ll transfer the deployable files

For this tutorial let’s assume the following values

remote server: tutorialdeployment.remote
remote username: user
local build directory: deployable
remote directory: /home/user/deployables/

Upon success, there should be three new files in the directory: husky.info, husky.build, and husky.deploy. The info file contains the information entered in the initialization process, while the build and deploy files are bash scripts with only the shell information, we’ll fill them up in the next step.

3. Provide your build commands (packing)

Open husky.build file in whatever editor you want and enter whatever commands you want executed. In our example, we want to pack the project, and move it to ./deployable so that the resulting files will be copied to the remote server. The file contains only a single line:

npm pack && mv web-server-0.0.0.tgz deployable/

npm pack‘ takes care of packaging your application into a single compressed file so that it could be copied from one place to another. Then we move the package file into the directory we specified in the initialization process (of course the name of the file will differ based on your project configuration). Generally speaking, your build file should contain as few commands as possible, this isn’t a build tool, it just calls one.

4. Provide your deployment commands (unpacking)

After the build process, Husky will automatically move ALL files in the build directory to the remote directory, in our case ‘/home/user/deployables/’ on the remote server. Then it’ll execute the commands in the husky.deploy on the remote machine, inside the remote deployment directory. This is important to understand: your commands here will run in the same directory as the deployment directory so there’s no need to cd. Our deployment script for our application will be:

tar -xzf web-server-0.0.0.tgz
cd package
npm rebuild
npm install

npm start &

The deployment file is also very brief, it basically extracts the package directory from the compressed file, performs rebuild and install operations inside the package directory then runs the application.

5. Run it all

After all that is ready, you can now run

husky run

This will run the pipeline, it will execute the script in husky.build, then transfer the files using scp, then it’ll run husky.deploy on the remote machine.


Sorenson-Dice Index = F1 Score

Starting with a known fact: Sorenson-Dice Index is the same as F1 Score. A fact I wasn’t aware of, given that I learned about the two in different occasions and for different applications.

F1 Score is usually taught in Information Retrieval courses as a metric to evaluate retrieval systems. They never said that it’s nothing but a reformulation of Sorenson-Dice Index but in terms of recall and precision. I’ll go through the proof quickly.

For any two sets A and B , the Sorenson-Dice Index is defined as \frac{2|A \cap B|}{|A| + |B|}

On the other hand F1 = \frac{2}{(1/R) + (1/P)} , where R is recall and P is precision. Now we need to prove that the previous formula could be reduced to Sorenson-Dice Index.

First we need to rewrite the equation in terms of sets. For any two sets A and B, we consider that A is the set of relevant documents, and B is the set of retrieved documents. That way we end up with the following equations: R = \frac{|A \cap B|}{|A|} , and P = \frac{|A \cap B|}{|B|} .

F1 = \frac{2}{(1/\frac{|A \cap B|}{|A|}) + (1/ \frac{|A \cap B|}{|B|})}

= \frac{2}{\frac{|A|}{|A \cap B|} +  \frac{|B|}{|A \cap B|}}

= \frac{2}{\frac{|A| + |B|}{|A \cap B|}}

= \frac{2|A \cap B|}{|A| + |B|}

Which is the same as The Sorenson-Dice Index.


Accepting O(log(n)) as a “Fairly Constant” Solution

Is O(log(n)) considerably worse than O(1) as an algorithm complexity? Should we strive to find the constant-time solution? There’s no definitive answer for that, and it usually is “depends on what you’re trying to achieve”. This is why I’m going to present the comparison in a more abstract sense, by looking at them.

Here’s what a constant function like f(n) = 5 looks likeconst

It’s just a boring straight line parallel to the x-axis, but it’s the best complexity we hope for. No matter how large the input is, it still requires the same number of steps.

Now let’s look at a logarithmic function such as f(n) = log_{10} (n)

log_10

Doesn’t look very bad, does it? Its growth is what you might consider “fairly constant”, it grows so slowly that it n = 1,000,000 to hit 6. But this because the base was 10, how about a smaller base, say 2, it will be way worse, right? From a complexity point of view, the base of a logarithmic function is just a constant, and it just doesn’t matter when it comes for asymptotic growth (you can have some fun finding why it doesn’t).

Let’s put f(n) = log_2(n) to test anyway. It’s worse but not “way” worse at all. At n = 1,000,000 the value was just 20.log_2

How about looking at it from a different point of view. There’s no such thing as 1.732 steps in algorithms or machines; it’s always a positive integer number of steps. So let’s round the logarithmic functions output up and use f(n) = ceil(log_2(n)) and f(n) = ceil(log_{10}(n)) instead and see how close to constant they look yourself.ceil_log_2

ceil_log_10

How to C

Oh C, the good old language which is still out there, and on which many newer languages are based. It’s common for people to think that C isn’t for the faint of heart, but the language is actually simple. So simple that it’s almost never the best choice for a large project which isn’t an operating system. Here I’ll not introduce C, or how to program using C. I’ll assume that you have some knowledge of the language, and will discuss how I like to use C by addressing common beginner mistakes and general stylistic preferences.


Good Code

I, to this day, still believe that ‘Good Code = Good Types + Good Functions’. Let’s think about it, the types you define (structs)  and the types you define a more representative or simpler alias for (typedefs), constitute the data the program will hold. The functions are the operations to be applied on those types. And that’s it, define your types and write proper operations and you’re good to go.


Good Functions

Before talking about types, let’s first talk about functions. Here’s the biggest mistake: long functions. While dealing with C, you’re most likely on your own, with nothing to help you but a debugger, a profiler, and function documentation at your disposal. So connecting to a server and receiving a chunk of data from it, in my mind, was a simple task that should be one function. I started going back and forth between my code and the documentations, stacking lines over lines in the same scope. In the end it worked, but it looked terrible. I moved on to the next task and repeated the same thing.

Some guidelines to write good functions:

  1. Small: Consider each sub-task a task on its own, and write it as such. In fact, every ((sub-sub)^n)-task should be written independently.
  2. Meaningful return: Return something, let it be an error, a state, or otherwise. Use ‘void’ only for a procedure routine; that’s something that just defines a certain flow of operations and that’s it.
  3. Stateless: Try as much as possible to avoid reading variables which aren’t part of your function arguments.
  4. Pointer-free: Do you really need a pointer for this? probably not. If you do, think again before passing it. You should avoid manipulating passed arguments, which means that you probably shouldn’t use a pointer for this.
  5. Callbacks: C supports higher-order functions, USE THAT! Don’t go too far or you’ll end up in callback hell and hate yourself (learn from your JavaScript experience).

Let’s discuss the guidelines a bit.

‘Small’, classic and everyone will tell you that all the time but hold on a second. By ‘small’ I mean really really small. I usually start from the function which represents the final goal, then I start going down as if it was a tree and everything I think of under it is a new function, apply recursively until you’ve hit rock bottom.

‘Meaningful return’. Man oh man. Just return something useful, damn it! Tell me how things went, give me a modified version of an argument instead of changing its value and let me decide what to do with it. Remove ‘void’ from your dictionary, you’ll know when you really need to use it when you start not using it all.

‘Stateless’. Everyone in the programming scene will tell you so, do as they say.

‘Pointer-free’. But that’s C, we have to use pointers. Do we really? You have the power to do something but that doesn’t mean that you should use it. Problems with pointers arise because of the abuse of pointers. Use them wisely and be considerate when you ask for a pointer instead of an object.

‘Callbacks’. Callbacks are fine, yeah they’re function calls and the compiler will not know how to inline them (I guess! Haven’t checked actually) but they are good way to chain operations together. Use them when you can. And since function pointers can get ugly, we’ll see how to deal with that in Good Types.


Good Types

There’s not much to say here, write good descriptive types which fit the purpose of your program or library. Define enums instead of passing integer if your values are categorical. Define typedefs for function pointers you want to use as callbacks and give them good names. Use typedefs to make a more meaningful alias of a generic type. And for the love of anything you hold sacred, define structs with typedefs.


Coding Convention

100% of experienced programmers will tell you that having a code convention for yourself and for a team is fundamental. Pick the one you’re most comfortable with and go for it. I personally prefer CamelCase for types (enums and structs) even when most C code bases use snake_case for them. I hate having ‘struct <type>’, use typedef struct instead. I also like snake_case for functions, leaving a space between a keywork or a function name and the parentheses (except for function calls). And if you follow the concept of making your functions small, you can easily encapsulate other coding conventions within the functions themselves, and hide them.

Taking this a bit further, I consider coding principles part of the convention. There are no restrictions here, whatever principal design you like to follow in the way you code, just follow it.


Heap Allocation

Two comments here: reduce allocations, profile your memory usage. Unless needed, use the stack memory instead, but the moment you start having heap allocation is the moment you use something like Valgrind to validate that you’re not messing anything up.


Ugly but Performs Well

In most cases you should favor good design and stylistic decisions over better performance. The reason is simple, don’t use relative performance comparison, use an ultimate set one and see if you hit or not. Instead of saying this piece of code is 25% faster, decide how much throughput, and as long as you’re satisfying that limit, relative performance within that range is meaningless. Oh, and did I mention profiling? STOP MAKING GUESSES, use a profiler, micro-benchmark (if needed), use Godbolt to see the compiler output of some pieces of code. When you’re done with that then decide if you want better performance or not.


Be Ready for Optimization

Yeah you don’t usually need to optimize, but what if you had to? Learn how to optimize the performance of your code, learn how to deal with bottlenecks. Just be ready so that when the moment comes, you don’t spend days learning first.


That’s it, that’s my philosophy while using C. I follow the same philosophy with other languages as well, but I’m not as pedantic with them.

HAllocators I

I recently started extracting few things from the current project I’m working on and sharing them on GitHub. Those things are mainly some utility projects I worked on as support for the main project. And one of those most useful sub-projects was the custom memory allocators. Here is the link to the project: https://github.com/kmehrunes/HAllocator


Motivation

Why would someone even care? If you asked this question then you probably don’t have to care. However, the decision to write those custom allocators wasn’t arbitrary at all. They were written to solve two main problems I had:

  1.  Allocating and freeing memory invokes a call to the OS to request the memory, and this is inefficient.  If you micro-benchmark it you won’t see a significant time waste, but in my case there were almost 2500 memory allocations per second (not even in a large scale deployment), each accompanied with a free.
  2. Tracing memory leaks could be problematic and tricky with large projects.
  3. Smart pointers are ugly (personal opinion), and raw pointers are a pain to deal with.

It took few hours to solve those problems, so it wasn’t, by any means, a waste of time.


The Allocators

There are currently three kinds of allocators:

  1. Raw blocks: Allocates a block of memory and returns void pointers to its sub-blocks.
  2. Type blocks: In other words, a dynamic array of objects. It keeps an array of objects of a certain type, and returns one at a time.
  3. Varys: It came from a terrible joke “what size will this allocate? it ‘Varys'”. It allocates blocks of any size that is a multiple of its smallest block size.

Each allocator also provides a free() function which doesn’t give the memory back to the OS, but just informs the allocator that a particular block is free.


But did they solve the problems we had? Yes they did. Let’s walk through them one by one.

  1. Calls for the OS: No longer happens, and allocating and freeing memory was almost 2x times faster, sometimes more.
  2. Memory leaks: Since we adopted no memory expansion policy, the whole program was bound to a maximum memory usage. When a certain part started allocating too many objects, we were able to trace that part from the stack trace directly.
  3. Raw pointers are safe: It does not matter if a pointer is freed or not, all memory blocks are freed once the allocator goes out of scope, or the program terminates. Also double-free (they were caused by an external library which had some memory management problems) no longer caused problems  at all, since they are just ignored.


Benchmarking

[soon will be available on Linux and on Windows]


Issues & Future Work

HAllocators isn’t really production-ready for general-purpose use. It still misses two key parts: thread safety, and expansion.

Functional Interfaces and Callbacks in Java 8

It’s undeniable that Java 8 was a great step forward for the language. For me, it made Java a bit less rigid than it was, and added some great features to the table. One of those additions was the introduction of Lambda Expressions accompanied by Functional Interfaces. Recently after being away from Java for a while I came back to it for a certain task, and it happened that I found using the aforementioned features to be the most convenient approach. That happened when I needed to make a chain of callbacks. I will leave reading about Lambda Expressions to you, and will just introduce Functional Interfaces.

What are Functional Interfaces?

Simply put, they are interfaces with a single abstract function. If the interface conforms to that single rule, it can be annotated as @FunctionalInterface. The word “abstract” here is important since not all functions in an interface need to be abstract anymore. Java allows programmers to add concrete default functions to an interface. Here are some examples of what does and what doesn’t classify as a Functional Interface.

  • Valid:

interface Example {
    void doSomething();
}
interface Example {
    void doSomething();
    default void doDefault() { ... }
}
interface Example {
    void doSomething();
    default void doDefault() { ... }
    static void doStatic() { ... }
}
  • Invalid:

interface Example {
    void doSomething();
    void doOtherThing();
}


What does make Functional Interfaces special?

This question has the same answer as “why are they required to have only one abstract function?”. Since it has only abstract function, one can assign a lambda expression in place of the interface, and that lambda will be considered as the implementation of the abstract function. This will come in handy when we talk next about callbacks.


Java callbacks

Remember the bad old days when you had to deal with Event Listeners and pretty much anything which represented a callback. You had to make a class which implements an abstract function of a superclass, and you had to write the full definition of the class, inline or separately. Well, you still have to do that, but now you can just write the definition of your funtction directly, which is way more convenient, and I did it as follows:

Callback interface:

@FunctionalInterface
interface ControllerCallback {
    void processResult(ControllerResult result, Exception ex);
    static ControllerCallback empty() { return new ControllerCallback() {
        @Override
        public void processResult(ControllerResult result, Exception ex){}
        };
    }
}

Here the interface has its lone abstract function processResult() which takes the result of the previous step and an instance of an exception (if any was thrown) as arguments. Additionally, one can add a ControllerCallback to the parameters, but that wasn’t needed in my case. The empty() function returns a callback which does nothing, it was added for testing cases which didn’t need the full pipeline of operations.

Function which uses the callback:

void operation(..., ControllerCallback callback) {
    if (...) {
        callback.processResult(ControllerResult.FAILED_NOT_FOUND, null);
        return;
    }
    
    try {
        ...
    } catch (Exception ex) {
        callback.processResult(ControllerResult.FAILED_OTHER, ex);
        return;
    }
    
    callback.processResult(ControllerResult.SUCCESS, null);
}

The function shows three ways the callback the used: to signal a failure which wasn’t caused by an exception, to signal a failure with an exception, and finally to signal that the operation was done successfully. It’s worth noting that an exception could be instantiated (but not thrown) and passed to the callback to provide extra information about the error.

Usage:

ControllerCallback operationCallback = (res, ex)-> {
    switch (res) {
        case SUCCESS:
            ...
            break;
        default:
            System.err.println("Failed");
            if (ex == null)
                System.err.println("No exception was thrown.");
            else
                System.err.println("An exception was thrown:\n"
                                   + ex.getMessage());
    }
};
controller.operation(..., operationCallback);

Notice how the callback was instantiated, it was assigned only a single Lambda representing the implementation of the function. This is much better than the old tedious way that Java forced us to use for a long time.

Solving Frequent k-Mers Problem using MapReduce (Bioinformatics)

The frequent k-mers problems is one of the very first problems introduced to those who took Bioinformatics I course on Coursera. It is a problem which is not difficult, but also represents a good introduction to the field since its naive solution is impractical, and it requires a little bit of optimization. After solving the problem as efficiently as possible, I started thinking of implementing it as a MapReduce task for practice.

First, does the problem really need to be distributed? I do not know! My lack of experience does not allow me to know much about how frequently people need to find the most frequent k-mers. However, for the sake of practice, I decided to implement it,; there is no harm. In this post, we will not discuss how to solve the problem itself, but rather we will discuss how to properly split the input to be able to write the MapReduce task correctly.


Problem definition

In case you are not familiar with the problem, it is simply defined as: “given a string, find the most common sub-string of length k”

Sounds similar? the problem is very similar to the word count problem, but all words are of a fixed length, and the output is only the words which occurred most frequently.


Solution

The solution is divided into four parts: partitioning, mapping, reducing, and finding the final answer. In order to implement it, I will use LazyMapReduce, but you can achieve the same thing with any other MapReduce implementation.

Since we are already familiar with Map and Reduce for the word count problem, we can just write them directly. Notice that the two functions are independent of how partitioning will be done, as Map will only work on an individual partition. This time, we will make a class which extends MapReduceTask and assigns Map and Reduce internally, instead of creating a MapReduceTask instance and assigning its Map and Reduce functions.

Just like the word count count problem, the MapReduceTask types will be ‘<object, string, string, int, string, int>’ (refer to the previous tutorial to know more about that). Therefore the structure of the class will be like this

public class FrequentKmersTask: MapReduceTask<object, string, string, int, string, int>
{
    string sequence;
    int k;
    int partitionSize;
 
    public FrequentKmersTask (string _sequence, int _k, int _partitionSize)
    {
       sequence = _sequence;
       k = _k;
       partitionSize = _partitionSize;
 
       this.Map = FrequentKmersMap;
       this.Reduce = FrequentKmersReduce;
    } 
}

Now we will work on the very first part of the implementation, which is how to split the genome sequence into chunks, each to be pushed as input to the Map function.

  • Naive partitioning

Let’s just divide the genome into equal-sized partitions, where the last one might be shorter than the rest, and make every partition start right after the previous one.

void PrepareTaks ()
{
      var index = 0;
      var length = 0;
      var partition = "";
 
      while (true) {
          length = Math.Min (partitionSize, sequence.Length - index);
          partition = sequence.Substring (index, length);
          PushInput (null, partition);
          index += length;
 
          if (index >= sequence.Length)
               break;
      }
}

That was easy, and we are done. NO, NOT SO FAST. There is a big flaw in the way we split the genome. A k-mer which is divided between two chunks will be ignored by our Map function. To make this clearer let’s try to check mathematically if the algorithm we use to partition a genome sequence will give us in the end the same number of k-mers or not.

First, we need to know how many k-mers a string of length N has, and it is N - k + 1 (you can try to verify that if you would like to). Then we split the string into m chunks with size n’, and according to our partitioning algorithm, m = N/n'.

Then we need to calculate how many k-mers will result from splitting the string the way we did. The total number of k-mers is \sum_{i=1}^{m} kmers_i =  \sum_{i=1}^{m} n'-k+1 = mn'-mk+m. Then after replacing m with $N/n’$ the formula can be rewritten as N - \frac{N}{n'} k + \frac{N}{n'} .

The only situation where N - \frac{N}{n'} k + \frac{N}{n'}  = N - k + 1 is when N=n' , which means that we do not split the genome at all. On the other hand, the solution is rather simple, and it only involves modifying one statement.

  • Correct partitioning

But before we go into the code, let’s fix the way we thought about splitting the string first, and change it to “divide the genome into equal-sized partitions, where the last one might be shorter than the rest, and make every partition start right after the LAST INDEX WHICH IS A VALID START OF A K-MER IN THE previous one”.

In a string of size N , the indices which are starts of k-mers are \{ 0, 1, ..., N-k \}. Therefore, for chunks of size n' , each chunk will start right at i_0 + n'-k+1 , where i_0 is the starting index of the previous chunk.

To achieve that we only need to change the way we update the starting index of the next chunk from the previous implementation, and convert it to

void PrepareTaks ()
{
      var index = 0;
      var length = 0;
      var partition = "";
 
      while (true) {
          length = Math.Min (partitionSize, sequence.Length - index);
          partition = sequence.Substring (index, length);
          PushInput (null, partition);
          index +=  partitionSize - k + 1; 
 
          if (index >= sequence.Length)
               break;
      }
}


And then, FrequentKmersMap and FrequentKmersReduce will be defined respectively as

List<KeySingleValuePair<string, int>> FrequentKmersMap (KeySingleValuePair<object, string> input)
{
    string kmer;
    var partition = input.value;
    var result = new List<KeySingleValuePair<string, int>> ();
 
    for (int i = 0; i <= partition.Length - k; i++) {
        kmer = partition.Substring (i, k);
        result.Add (new KeySingleValuePair<string, int> {
            key = kmer,
            value = 1
        });
    }
 
    return result;
}
 
KeySingleValuePair<string, int> FrequentKmersReduce (KeyMultipleValuesPair<string, int> input)
{
    return new KeySingleValuePair<string, int> {
         key = input.key,
         value = input.values.Count
    };
}

Since everything is ready, the only remaining task is to find the most frequent k-mers. The results of all Reduce calls can be retrieved by calling GetResults(), then by iterating through them we can find the most frequent k-mers as follows

public List<string> GetFrequentKmers ()
{
     var results = GetResults ();
     var kmers = new List<string> ();
     var maxCount = 0;
 
     foreach (var kmer in results) {
         if (kmer.value > maxCount) {
                maxCount = kmer.value;
                kmers.Clear ();
                kmers.Add (kmer.key);
         } else if (kmer.value == maxCount) {
                kmers.Add (kmer.key);
         }
     }
 
     return kmers;
}


Lazy MapReduce for C#

Hello, a few days ago I developed LazyMapReduce, which is a single file that anyone can add to their project and use it to implement some tasks as MapReduce functions. In this post, I will discuss the motivation behind it, what LazyMapReduce is for, and show a simple example on how to implement a MapReduce task using it.

The project is hosted on GitHub and is written in C#, but I will add another implementation later for Java, and maybe Scala.


Motivation

I was bored, and I wanted to implement something as a MapReduce task, but did not want to install Hadoop. Therefore, I decided to fill my time by creating my own MapReduce.


Why LazyMapReduce?

LazyMapReduce is an implementation of MapReduce which does not require any configuration, and does not run in a distributed environment. It is not a good implementation by any means for any practical use. It only serves as a simple and easy way for those who want to learn or practice MapReduce, or those who want to try to implement something first to make sure it works. LazyMapReduce is solely meant for educational, practice, and try-out purposes only.


Example

The hello world example of MapReduce is the infamous word count problem. You can hardly find any tutorial about MapReduce which does not include that example, so we will go with the flow and implement it. The example here assumes that you have some knowledge of MapReduce already, and know the concepts of generic classes and lambda expressions. If you do not, then I would advise to have a look at them before continuing this example. But they simple to grasp and you might get an idea on how they work if you just follow the example.

Class MapReduceTask makes use of delegates in C# (and VisualBasic.NET). It has a MapDelegate and a ReduceDelegate, for Map and Reduce functions, respectively. Hence, Map and Reduce functions are to be assigned to any function which has the same signature as the delegates.

The use of delegates gives us two ways to implement a LazyMapReduce task. The first is by extending the MapReduceTask and then assigning the Map and Reduce functions internally. The second is by declaring a MapReduceTask object and then assigning its Map and Reduce functions. In this example, we will follow the latter.

  • Instantiating a MapReduceTask

MapReduceTask<object, string, string, int, string, int> wordCount =
          new MapReduceTask<object, string, string, int, string, int> ();

MapReduceTask class is generic, which means that it needs its types to be passed to it as it is initialized. The types, in order, represent: Map input key type, Map input value type, Map output key type, Map output value type, Reduce output key type, and Reduce output value type.

Both the Map and Reduce functions rely on delegates which use generic data structure whose types are assigned based on the types given to the task. Note that it is preferable to declare such variables using ‘var‘ to make the line more concise, but a full declaration is shown here for illustration purpose.

  • Map Function

In our word count example, the Map function should receive a key-value pair of types object and string. We do not really care about the key in this case, so anything would work. Then it should return a list of key-value pairs of types string and int, as specified as Map output types. Where the key is a single word, and the value is either the number of occurrences of that word. Alternatively, people usually go for the simple solution and with every occurrence of a word they add (word, 1), and then let the Reduce function handle counting them. As usual, we will go for the second option, and our Map function will look like this:

char[] delims = new char[] { ' ', ',', '!', ';', '?' };  
wordCount.Map = (KeySingleValuePair<object, string> input) => {
       string[] words = input.value.ToLower ().Split (delims);
       var result = new List<KeySingleValuePair<string, int>> ();
 
       foreach (string word in words) {
             result.Add(new KeySingleValuePair<string, int> {
                  key = word,
                  value = 1
              });
       }
                     
       return result;
};
  • Reduce Function

The Reduce function in the word count example is much simple that the Map function, it is just basically adding all the value which are associated with a certain key to get the total sum. Hence, the Reduce function will be:

wordCount.Reduce = (KeyMultipleValuesPair<string, int> input) => {
       return new KeySingleValuePair<string, int> {
              key = input.key,
              value = input.values.Count
       };
};
  • Passing Input to the Task

We can pass the input to the task simply by just pushing some key-value pairs of the specified Map input types in the declaration. Since for word count there is no input key, we will just pass null. In this example, we will declare an array of strings, where each string represents an independent text, and the goal is to find the frequency of each word across all of them.

string[] texts = ...;

foreach (string text in texts) {
       wordCount.PushInput (null, text);
}
  • Running the Task

The final step now is to run the task when everything is set up. Unlike Hadoop, the Map function does not emit one by one (writes to context) so that the task does not need to wait for all of Map outputs to proceed. However, LazyMapReduced is not optimized for such tasks, so it will wait until all Map outputs from all Map calls are ready, then it will proceed.

In order to run the task we just need to call the function Run (). Run function has another parameterized overloaded function which takes to boolean values. The boolean values indicate whether, Map and/or Reduce tasks should run in parallel respectively. Calling Run without any parameters will result in both Map and Reduce running their tasks sequentially.

 wordCount.Run (true, true);
  • Getting the Results

After the task is run, we can get the results as an enumerable of key-value pairs of specified Reduce output types.

var results = wordCount.GetResults ();
var resultsEnumerator = results.GetEnumerator ();

And that is it, now we have a simple, easy-to-use way to work with MapReduce for the lazy.


Note: You can use LINQ to get a similar MapReduce approach. However,LazyMapReduce aims to mimic the way things like Hadoop work, so that one can play around and also get familiar with something close to how a real MapReduce implementation will look like.