Development of iArabicWeb16 Search Engine (1) – Introduction

Two years ago, I started working on building a search engine for a web collection for Arabic web pages and tweets called ArabicWeb16. The collection contained around 150M web documents, and a lot of tweets (I don’t really remember the number). The project was quite challenging, especially for an undergraduate who hasn’t worked with such amount of data before and had to work on everything on his own. In this post, and the ones to come, I’ll go into the development process of the search engine and some of the decisions I made along the way.

Note: Some of the information mentioned here are discussed in a paper which was accepted into OSACT 2018.

The Requirements of the System

The requirements were very straightforward, here they’re:

  1. It should be able to index WARC files
  2. Indexing should be configurable and should have an option for parallel indexing
  3. The searcher should have an API for external use
  4. The searcher should allow retrieval of cached documents (i.e. the documents shouldn’t just be indexed, they have to be stored somewhere)

Tools, Languages, and Frameworks

Just like any other projects, some decisions regarding what will be used for the development process had to be made upfront. Here we’re going to go over some of the decisions related to that.

Java and Lucene

Although other options exist (such as Indri or Terrier), the obvious choice for any custom search engine is definitely Lucene with Java (or any other JVM language really). I could have used something like Solr as well to make my life easier, but I went with vanilla Lucene for the experience.

MongoDB

We need to store raw documents, sure we can store the content of documents in the index but there are multiple reasons why you probably shouldn’t do that, those reasons will be discussed in the posts to come. In the end, I settled for MongoDB, it’s convenient, fast, and fits the problem perfectly. If we wanted to store relations between documents as in constructing a web graph, the better option would have been Neo4j but we had no need for that.

Play Framework

Since we wanted to provide a search API, I needed a web framework to build a REST API, and for that I chose Play. Play comes packed with features that make developing web back-end an easy experience. It also supports concurrency, and is highly configurable.

NodeJS

Why do we need two web servers? Simple, one for the web interface and one for the search API. Why not mix the two together? check the next section for an answer. Why NodeJS? it’s easy, lightweight, and super fast to build a web back-end with. Of course you can easily write a messy server code with it since it’s JavaScript, but I shamefully did in some parts. I had to refactor many parts of the code later after I was more experienced with JavaScript.

Search Architecture

In this section we’ll discuss the architecture of the system without indexing; details on the indexing phase will be discussed in the next post.

We mentioned some technologies in the previous sections but we didn’t mention how they all fit together. This figure will show how the all interact with one another.

arch

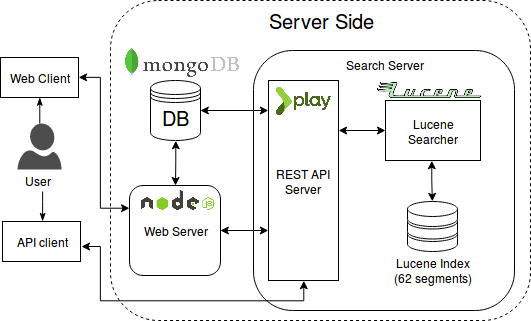
As you can see, a user can either search using the web interface, or using the REST API (of course a key needs to be acquired before having access to the REST API server).

So why do we have two web servers? If the world of software engineering has taught us one thing it’s got to be that coupling is bad, and in our case, here’s precisely why:

  1. What happens if we wanted to deploy each one on a different machine? We can’t
  2. What happens if we wanted to modify one of them? We have to shut down everything and redeploy
  3. The most important point, what happens if we wanted to distribute the index and have multiple search servers, one for each? Again we can’t do that if we’ll put everything into one piece
  4. The web server takes care of rendering web pages but it also manages users, sessions, and provides access to a topic collection tool (only visible to certain users). None of that has anything to do with searching the collection. It only makes sense that we have a separate server which takes care of those things


That’s all for this part, in the next post we’ll talk more about indexing the collection.

Automating Manual Deployment

Who doesn’t love automating tasks, especially the tedious deployment tasks? And yes there are tons of tools to help you make your life easier, after all who needs manual deployment in the age of Continuous Delivery? Well, it all depends on your project and whether you actually need to waste time setting up some fancy tools to help you; use the right tool for the right job.  Sometimes it’s just easier to deploy using the good old SSHy way, which is is what I chose for one of the projects I was working on. Of course I wrote scripts to handle deploying each part of the application, but I came to realize that those scripts could be abstracted into a tool in order to minimize the work in the future (and avoid mistakes).

In this tutorial we will have a look at Husky (find it on Github here) and use it to automate deploying a simple NodeJS application. Follow the installation instructions on the Github project to properly install it.


Before we start, Husky relies on SSH so do yourself a favor and generate an access key to the server, unless you love your password so much that you want to keep typing it.

Husky Operations

The pipeline of operations is fairly simple

huskypl

First we build (and package the files we wish to deploy), we transfer them to the remote server, and then we run the project there. In the next section we’ll see how to take care of those tasks using Husky.

Example

In this section we go through a simple scenario of deploying a toy NodeJS project to a remote server and running it.

1. Create your project

Needless to say, you need to create your project beforehand. We’re not going to go through the process of creating a new NodeJS project, there is plenty of resources about that.

2. Initialize Husky files

Make sure that you’re in the directory of the project you want to configure its deployment then run

husky init

You’ll be promoted to enter the following:

  • IP or host name of the remote server
  • The username by which you’ll login into the remote server
  • The build directory from which we’ll grab the deployable files
  • The remote directory to which we’ll transfer the deployable files

For this tutorial let’s assume the following values

remote server: tutorialdeployment.remote
remote username: user
local build directory: deployable
remote directory: /home/user/deployables/

Upon success, there should be three new files in the directory: husky.info, husky.build, and husky.deploy. The info file contains the information entered in the initialization process, while the build and deploy files are bash scripts with only the shell information, we’ll fill them up in the next step.

3. Provide your build commands (packing)

Open husky.build file in whatever editor you want and enter whatever commands you want executed. In our example, we want to pack the project, and move it to ./deployable so that the resulting files will be copied to the remote server. The file contains only a single line:

npm pack && mv web-server-0.0.0.tgz deployable/

npm pack‘ takes care of packaging your application into a single compressed file so that it could be copied from one place to another. Then we move the package file into the directory we specified in the initialization process (of course the name of the file will differ based on your project configuration). Generally speaking, your build file should contain as few commands as possible, this isn’t a build tool, it just calls one.

4. Provide your deployment commands (unpacking)

After the build process, Husky will automatically move ALL files in the build directory to the remote directory, in our case ‘/home/user/deployables/’ on the remote server. Then it’ll execute the commands in the husky.deploy on the remote machine, inside the remote deployment directory. This is important to understand: your commands here will run in the same directory as the deployment directory so there’s no need to cd. Our deployment script for our application will be:

tar -xzf web-server-0.0.0.tgz
cd package
npm rebuild
npm install

npm start &

The deployment file is also very brief, it basically extracts the package directory from the compressed file, performs rebuild and install operations inside the package directory then runs the application.

5. Run it all

After all that is ready, you can now run

husky run

This will run the pipeline, it will execute the script in husky.build, then transfer the files using scp, then it’ll run husky.deploy on the remote machine.